
Materials Used
We used several products and supplies in the making of our fun fall sign. Below is a list of what we used.
- Hello Fall Mantel Sitter Sign – DIGITAL DOWNLOAD SVG
- Recollections cardstock
- Recollections Foil Cardstock
- Art Glitter Glue
- Printable Papers (coming soon to our shop!)
- Royal Brites White Foam Board
- Variety Of Embossing Folders
- Electric Cutting Machine: Cricut or Silhouette
***Note that this post contains affiliate links and we may receive compensation if you buy something using one of our links. ***
An F For Our Fall Sign
This sign has a couple components that need to be assembled, then we can attach them to the base to complete the project. To start with we built the letter F. This is done with two F shaped panels and two long panels to go around the outside.

You’ll note that one of the panels has tabs on either end. The smaller tab is attached to the other long panel (on the end without a tab). The larger tab is used to attach to the base of the sign later. To start, we folded on the tabs, and added glue to the two longer tabs that go along the side and top of the F. This is the long panel with just one tab at the end and two long sections. Doing the two together allowed us to attach the tabs and create a snug fit using the 90 degree corner as a helpful guide.


We then attached the other panel (using the small end tab with the cut line on it). Once this was secure, we continued to attach the panel to the F shape a couple tabs at a time until the entire panel was secured in place.


Closing Off The F
Our next step was to add the other F shape to the side and close off the shape. To do this we started by adding glue to the long tab. Make sure to get the F panel secure and lined up. We then glued a couple tabs at a time. Make sure that the sides were squared up with the F shape. If the sides are too far in, you can use a craft knife or other tool to pull them back out. If they are too far out, you can use your finger to slide them into position so the edge is flush.


Adding An A To The Sign
With the F complete, we moved to the A. This has two A shaped panels, and three side panels to go around the shape. One makes the bottom of the A, one the top, and the third goes in the center. We started by taking the longest of the tabs and folding on the score lines then attaching to one side and the top of the A.


We chose not to attach the third side yet. With it not attached to the side we could reach into the A easier and get the other pieces positioned. Our next step was to take the part that makes the triangle in the center of the A. You’ll note that it has two longer sides and one very short. We added glue to the tab at the end and folded to create this small triangle shape. Make sure your tab is on the outside and your pattern is on the inside if you are using a decorative paper. That way the pattern will be visible in the A and the tab won’t show when assembled. Let the glue set as you are going to put some pressure on the connection of this structure in order to get it placed in the A. We chose to press the long sides in a little as we slid it through the triangle cut out of the A. It’s a snug fit and this let the shape go through easier. Once you have the trinagle shape through, you can take a pencil and put it through the shape to encourage the sides to pop back out and straighten. Once this is done, you can add glue to the tabs on one end and attach to the back of the A.


Next, we took the unused panel and folded on the score lines then added glue to three of the tabs. We used these to make the bottom of the A.


We then added glue to the other tab for the side of the A and positioned it.

Finishing The A
To finish the A, we added glue to the top, center tab and positioned the A panel. Once this was set, we added glue to the side tab and the tabs that make up the botom and center of the A. This gave us sometime to make sure we got the tabs correctly positioned on the A. We used our craft knife handle to put through the triangle and get it positioned right with the A panel. We then added glue to the last panel and attached the A. You can do as many or few tabs as you please for this step, we just felt it was easier to separate it into two sections.


Building The L
There are two L shapes that make up the sign, both are identical and the easiest of the shapes. We started by adding glue to two of the tabs and attached, using the 90 degree corner to help make sure they are in position correctly and snugly. We then worked our way around the rest of the L.


Closing Off The L
We then closed off the L shape by attaching the L panel on the long side then attaching to the other tabs.


Decorating The Sign
There are decorative panels for the front and back of each letter. To attach, we added glue to the back of the decorative letter and attached to the shape we constructed. Make sure that the decoative panel is flush with the top of the letter shape.

Building Trees For Our Sign
With the letters constructed and decorated, we moved to assembling the trees. There are two trees, one on each side of the sign. They are each constructed using 4 tree shapes. The two are constructed identically so we’ve shown the assembly directions for one tree below. We started by cutting all the tree shapes and folding along the score lines, using a bone folder to get a crisp fold. You could use your fingernail, handle on your scissors or other tool to create a sharp crisp fold. We then started attaching the leaf decorative panels. There are four on each tree. Note that you’ll make four trees facing one way and four trees that are the mirror image so keep track of which leaf panel goes on which tree.

We did find it easiest to attach the two outer leaf panels (shown above in maroon and orange) before attaching the two in the center. This allowed the two in the center to line up with each other and the two outer panels easily and not leave any gaps or overlap from accidently misplacing the panels.
Once we had all the tree pieces assembled, we attached them back to back, half a tree at a time, so that we could create a four sided tree shape. Make sure not to glue the tabs at the bottom of the trees as you’ll need these to attach them to the base panel later.


Attaching The F
Our next step was to start attaching the letters to the decorative panel for the base. There are cut outs for each of the letters. Be sure you have the F and the Ls facing the correct direction when you put them into the holes so that they aren’t facing backwards. We chose to start with the F, slide the tabs through the hole on the far left, add glue and secure them to the underside of the panel.


Adding A And Ls
We then repeated this process with the A and both L’s.


Putting Trees On The Sign
With the letters in position, we started to work on adding the trees to the sign. They are attached using the x shaped cut outs on the base panel. Slide the base of the tree through one of the X shapes. This can be a little tricky but take your time and get all of the base through. You may need to turn the sign over to do this, if so, set the top of the letters on a stack of books or something to give you room to work. Once the base is through, add glue to the tabs and fold them out before pressing them in place with your fingers. When they are starting to be secure, turn the whole thing over and give them a good press from the other side. Once done, repeat the process with the other tree.


Adding Hello
To finish the words part of this project, we cut the word Hello out. It is made to be double sided as well, so that once assembled you have back to back tabs on the bottom that you can fold out to help give you a secure and stable hold no the panel. This panel we cut in the same paper as the F so that it would blend in and look seamless. Once we had the Hello glued back to back, we slid the tabs through the slots in the panel and glued so that the Hello would be secure. Once this was done, we added glue to the bottom of the panel and placed on the top of the F.


Making A Rake
At this point we set the project aside for a moment and started to assemble a few of the decorations that will be added in a bit. We put together the rake, this is made of two sides that are nearly identical. One side (pictured here it comes to a point, but we changed it to be longer and match the other side) has a score line in the handle, this is where you can bend it down and use as a glue point for attaching it to the sign later. If you want to do it this way, don’t glue that end to the other rake. If you prefer to glue it to the other end, you will have a smaller area available for attaching to the sign later. When complete, you’ll have a double sided rake. After making sure the piecces are securely glued back to back, we took the end of our quilling tool and used it to curve the tinds of the rake.


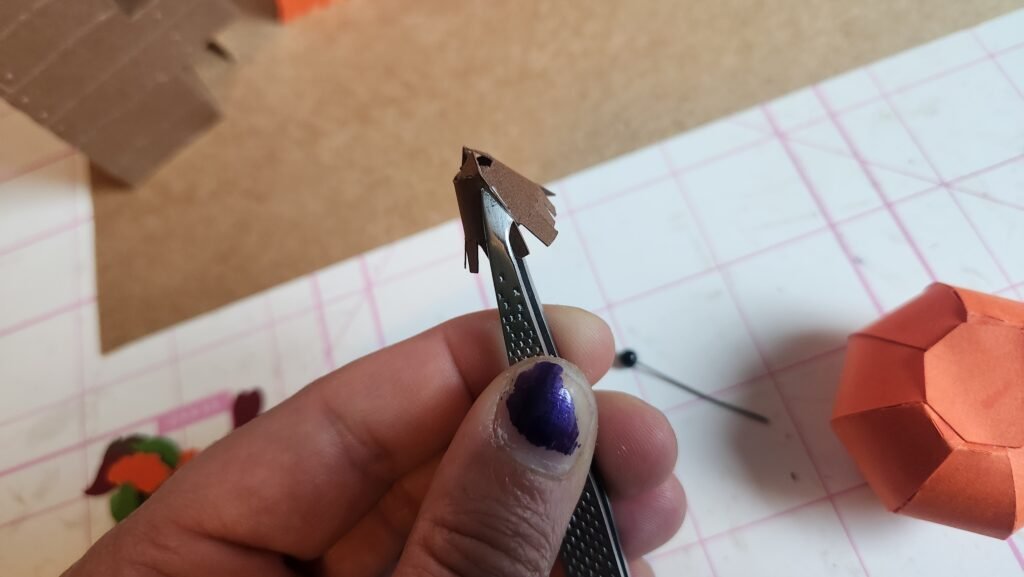
Crafting A Pumpkin
We also chose to make the pumpkin at this point. The pumpkin goes together pretty quickly as we tried to minimize how many pieces you had to assemble given it’s pretty small. The body of the pumpkin is just to pieces, the large panel which has eight pieces sticking out. Curve each of these and add glue to the tabs to secure to the neighbor. Continue around until you have attached all of them, creating a pumpkin shape. The final one may be a little hard to reach your finger in and apply pressure to the tabs, if this is the case, use tweezers to hold the bottom tab in place while the glue sets. Once all eight are in position, fold in the tabs on the top, add glue and place the octagon panel to close off the pumpkin.


Next we took the curved panel that makes the stem and added glue to the end tab, curved it around and attached to give the cone like stem shape. This piece is definitely too small for our fingers to reach into so again, we used the tweezers to help hold the piece in position and apply pressure to the tab on both sides.

When this is secure, you can fold in the tabs on the larger opening and add glue then place the circle panel to top off the pumpkin stem.


Before attaching this to the top of the pumpkin, we set it aside for a moment to dry while we worked with the vines and leaves. The vines we chose to use our quilling tool to twirl and shape. Once we were happy with how they looked, we added a spot of glue to one end on each and attached to the top of the pumpkin. When these were secure, we added glue to the bottom of the stem and placed in the middle of the pumpkin top where the vines met.


We waited a few minutes to be sure that the stem was secure. Once we were confident it was, we took the leaves, folded them in half to give them a little shape and interest, then added some glue to one corner on each, and placed them next to each other on one side of the stem.


Making A Pile Of Leaves
We placed our pumpkin with the rake and started working on the leaf pile. This is where there’s a lot of room for personalization. To start, we took the panel that makes the base, curved each of the sections then attached sing the tabs, this is similar to the pumpkin but rather than making a ball it makes only half the ball shape.


The file has three sets of panels in three colors for the leaves on the pile. You can cut them in other colors, add more or just do two colors, whatever look works for you. The panels are the same, so how you place them on the pile will change up how they look in addition to the colors. We started by attaching just a small part of the leaf panel to the top of the pile. Once this was set, we added a couple more spots of glue and folded it down onto the pile. This lets some of the leaves stick up rather than being flat on the pile. After the first was in place, we added two more panels to cover the rest of the pile.
After the first round is complete, add another three layers, making sure to rotate them a little so that lay them over the gaps/seams of the lower level. You can chose to have some of the loose leaves poke through this layer as well. We chose to do three layers of leaf panels, you can chose to do as amny or as few layers as you want.


A Side Note On The Base Panels
You’ll note that the side panels of the base are longer than 12 inches. You can still use 8×11 paper to cut these pieces if you turn them to an angle to fit on the page. Below is a screen shot of how they looked before cutting. The dark dray is the size of an 8.5×11 piece of paper and the green panels are the long tabbed panels on the sides of the base.

Time To Build The Base For The Sign
Our next step was to construct the base that will support our decorations. The base is made using four side panels (two long, two short) and the large rectangular panels to close off the base. We attached the side panels end to end, alternating between long and short, in order to create a rectangular shape.


Once you have this shape, fold in the tabs on one side, place glue on the inside and press in one of the rectangular panels. Each panel is identical so you can use either one for this step.


Next, we used the foam board template (it is just slightly smaller than the rectangular sides used for this structure) to help us cut two pieces of foam board. These pieces will fill the inside of the base to give it some strength and prevent sagging over time. We chose to glue them into place. The template is 11×5 inches. Instead of having your machine cut the paper, you can use a manual paper cutter or a ruler. Cut an 8.5×11 piece of paper down to 5×11.


We then used the other rectangular panel to close off the shape. We added glue to one of the long tabs and positioned the panel, making sure it was aligned straight. Once secure, we added glue to the other three tabs and secured the panel.


Decorating The Sign Base
If you are using the included decorative panels for the sides of the base then now is the time to attach them. There are four strips for the decorative panels that go along the sides. Attach them as shown.


With these secure, we added glue to the platform we built. Add glue to the side with the exposed tabs, this way they are covered on all sides of the platform. Place the FALL letters and panel on the platform and use your fingers to gently press down over the whole panel to get a secure and even attachment.

Adding The Embellishments
We then decided where to place the leaf pile, rake and pumpkin. To attach the leaf pile, we folded in the tabs on the bottom, added glue and pressed it into place. We recommend testing where you want it to go first. You may want to trim the leaves a little if they are in the way of placing it where desired. The leaves are intended to go beyond the edge of the leaf pile construction so they may bump into the letters in a way you don’t want. We trimmed a little off the back so we could pace the pile closer to the letters.


We then added glue to the bottom of the pumpkin and placed it in front of one of the L letters. You can chose to move these pieces around to fit the look you like best.


We then added glue to the bottom of the rake and to the tab on the back and placed it leaning against the L. We took a the narrow end of our tweezers to reach in and press the tab against the L to help secure it in to place.


As a final touch we took some of the leaves and attached them around on the sign. You can see them in earlier photos as we were playing around with placement but we waited to glue once the larger decorations were in place. If you wish to place yours first you can do that as well. We thought they added a nice touch especially when using a plain paper like we did with the brown base we have here.


Leave a Reply